
A gasket works by conforming to two metal surfaces under bolt load. When it’s installed correctly, the joint seals quietly for years. When rushed, the gasket blows out, the flange leaks, and someone gets called in on a weekend. The steps below are the field method, not the textbook summary.
Before You Touch a Bolt
Most installation failures trace back to poor preparation. Get the flange area ready, verify what you’re working with, and the actual installation becomes straightforward.
Inspect the Flange Faces
Put a straightedge across both flange faces. Look for dents, radial scores, or pitting that crosses the sealing width. Anything that catches a fingernail can create a leak path under pressure. Light marks can be dressed with a fine oil stone. Deep grooves, weld spatter, or corrosion pits mean the flange needs resurfacing before a new gasket goes in.
Check the flange flatness. A warped flange pulled down with bolts will crack the gasket on the high side and leave a gap on the low side. If the gap under the straightedge exceeds the tolerance in the flange standard, don’t rely on the gasket to compensate. Fix the flange.
Confirm You Have the Right Gasket
Measure the flange sealing face. For a raised face flange, note the inner and outer diameters, the pressure class, and the facing finish. Match the gasket to the media, temperature, and pressure. Never cut a new gasket by tracing an old one—the old gasket may have been wrong to begin with, or it may have compressed and distorted.
For pipe flanges, reference ASME B16.21 for non-metallic flat gaskets or B16.20 for spiral wound gaskets. For non-standard equipment, use a proper template or measure the hardware directly.
Gather Your Tools
You need a calibrated torque wrench, a brass scraper (never steel), a brass wire brush, solvent cleaner, lint-free rags, a soft mallet, bolt lubricant or anti-seize, and a good light. For large flanges, flange spreaders prevent prying damage. For deep-set gaskets, a gasket scraper with a long handle helps.
Step-by-Step Installation
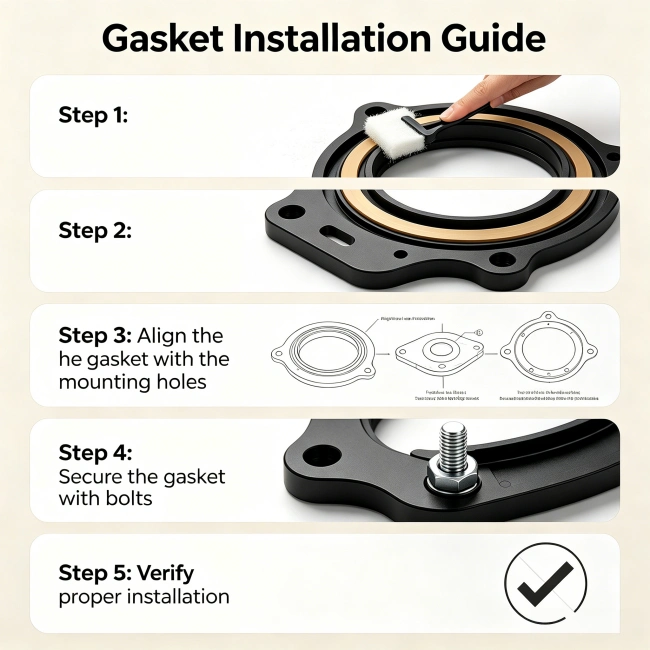 Once the flange is clean, the gasket is verified, and the tools are laid out, follow the sequence below. Do not skip steps or combine stages.
1. Clean Both Flange Faces
Use the brass scraper to remove every trace of old gasket. Old material left in the corner of a raised face or stuck around a bolt hole will hold the new gasket off the metal. Scrape from the outer edge toward the center to avoid dragging debris across the sealing surface.
Follow the scraper with a brass wire brush and solvent. Wipe until the rag comes back clean. The faces must be dry before you set the gasket. Oil or solvent residue can act as a lubricant and let the gasket extrude under pressure.
2. Set the Gasket in Place
Lift the gasket onto one flange face. Center it carefully. No part of the gasket should hang into the pipe bore or block a bolt hole. For spiral wound gaskets, the outer centering ring should sit snugly inside the flange bolts. If it doesn’t, the gasket is the wrong size or the bolts are bent.
For large sheet gaskets that might sag, a tiny dab of a compatible adhesive at two or three points can hold the gasket in place while you close the flange. Never smear adhesive across the entire face—it changes the friction and can cause the gasket to slide during tightening.
3. Bring the Mating Flange Down
Guide the mating flange or cover straight onto the gasket. Do not drag it sideways. If the gasket shifts as the flange comes down, stop, lift it off, and reset. Once the flanges meet, insert all bolts and run them down finger-tight. The gap should be even around the circumference. If one side is tighter than the other, the flange is cocked and needs realignment.
4. Lubricate the Bolt Threads
Bolt torque specs assume a lubricated thread, unless stated otherwise. Apply anti-seize or the specified thread lubricant to the bolt threads and under the nut bearing face. Dry threads create friction that eats up torque—you’ll under-compress the gasket without knowing it. Skip lubrication only if the manufacturer’s torque chart explicitly states dry torque values.
5. Tighten in a Star Pattern
Number your bolts in sequence and use a diagonal or star pattern. On a four-bolt flange, tighten opposite pairs. On a multi-bolt circle, jump across the flange with each pull. Never walk around the circle in order—that tilts the flange and loads the gasket unevenly.
Tighten in at least three passes: first pass to roughly 30% of target torque, second pass to 60%, final pass to 100%. This staged approach lets the gasket bed evenly. Large flanges or soft gaskets may need a fourth pass. After the final pass, make one more full sweep around the flange in sequence to catch any bolt that has relaxed.
6. Hold to the Specified Torque
Use the gasket manufacturer’s torque table, not a generic chart. Different materials need different seating stress. A graphite gasket compresses more easily than a non-asbestos fiber sheet. A rubber gasket needs far less torque than a spiral wound ring. Over-tightening crushes soft gaskets and can warp thin flanges. Under-tightening leaves the joint open.
When no torque value is available from the gasket supplier, refer to the applicable flange standard for minimum seating stress and calculate the required bolt torque. Do not guess.
Material-Specific Notes
 Each gasket type reacts differently under load. The generic tightening sequence holds for all of them, but the details below prevent the most common installation failures.
Non-Asbestos Fiber Gaskets
Fiber sheet gaskets compress and take a set. Do not retighten them repeatedly after installation unless the manufacturer permits it. The binder can crack if the gasket is over-compressed. If the joint leaks after the initial heat cycle, more torque usually isn’t the answer—the gasket has likely burned out and must be replaced.
Graphite Gaskets
Reinforced graphite gaskets—especially those with a tanged metal core—need even bolt load to prevent crumbling at the edge. Handle them gently; graphite scores and flakes. Check that the gasket thickness matches the flange gap. A graphite gasket that is too thick will extrude when torqued. A graphite gasket that is too thin won’t seal.
On stainless steel flanges, use inhibited graphite grades to reduce the risk of galvanic corrosion. If the system will see water, this matters more.
PTFE Gaskets
Pure PTFE cold-flows. A PTFE gasket that is compressed too hard will thin at the inner edge and relax. Torque values for PTFE are lower than for fiber or graphite. Use a filled PTFE or an envelope type if the joint sees thermal cycling. After the first temperature cycle, a controlled retorque may be needed—check the manufacturer’s instruction. Never retorque a PTFE gasket that has cooled to ambient; it may crack.
Rubber Gaskets
Rubber seals at low bolt load. The torque spec for a rubber gasket is often just enough to bring the flanges to metal-to-metal contact in grooved designs, or to a specified gap in flat-face joints. Over-tightening cuts the rubber. A rubber gasket that extrudes out the sides has been crushed. Use a torque wrench, not an impact gun.
Spiral Wound Gaskets
Spiral wound gaskets must be centered by the outer ring. The winding is the sealing element; the outer ring aligns it and prevents over-compression. If the flange has no centering recess, the bolts themselves serve as guides—make sure the gasket ring fits easily between them.
Inner rings, when specified, face the process side. They protect the winding from flow turbulence and media attack. Don’t omit them if the design calls for one. Tighten spiral wound gaskets to the recommended compression—usually until the outer ring meets the flange face. Going tighter crushes the winding and reduces recovery.
Spiral wound gaskets are single-use. Never reinstall one that has been in service.
Exhaust Gaskets
Exhaust gaskets are often multi-layer steel or composite. Clean the manifold and head surfaces back to bare metal. Carbon buildup in the sealing area must be removed completely—a scraper and a wire brush followed by solvent. Align the gasket with the port openings. Tighten the fasteners in a crisscross pattern and in stages, starting from the center ports and working outward on multi-cylinder engines. Exhaust manifold bolts stretch and seize; replacing them with new fasteners during a gasket change is standard practice on many engines.
Equipment-Specific Guidance
Pipe Flanges
The standard star-pattern tightening described above covers raised face and flat face pipe flanges. For large-diameter flanges (above 24 inch), use two operators tightening simultaneously on opposite sides to keep the load balanced. A single operator walking around a large flange will skew it.
Flange alignment is critical. Pipe strain will pull the flanges apart after the gasket is compressed. Support the pipe on both sides of the joint before tightening, and leave the supports in place. Never use the gasket to take up an angular gap between misaligned flanges.
Heat Exchanger Gaskets
Heat exchanger gaskets are often large, thin, and located in a groove or on a partition plate. Clean the groove out fully—a pick or a narrow brass brush gets into the corners. The gasket must sit flat in the groove without being stretched or forced. For jacketed or double-jacketed gaskets, make sure the jacket surface is smooth and free of wrinkles.
Follow the bolt tightening sequence in the exchanger manual. Most have a specific numbered pattern. Tighten in stages and measure the gap at several points around the periphery to confirm the closure is even. An uneven gap on a large floating head or channel cover will distort the gasket and cause a blowout.
Valve Bonnets
Valve bonnet gaskets seal the pressure boundary. Before installing, clean the bonnet flange and body flange thoroughly. Check for erosion or wire-drawing near the seat area—gasses or liquids cutting a channel through the flange face. A new gasket will not seal a washed-out surface.
Insert the gasket squarely and bring the bonnet down evenly. Tighten the bonnet bolts in a diagonal pattern, then cycle the valve stem by hand before pressurizing. This movement beds the gasket slightly and can reveal binding. After the valve is under pressure, check the bonnet joint for seepage.
Pump Casings
Split-case pump casing gaskets must bridge the parting line without blocking the impeller or wearing rings. Trim the gasket carefully so it doesn’t protrude into the water passage. Apply a light coating of a compatible sealant only if the pump manufacturer recommends it—many gaskets are designed to be installed dry.
During reassembly, keep the casing halves aligned with the dowel pins. Do not force the halves together with the bolts; if they don’t close easily, something is misaligned. Tighten evenly in a staggered pattern from the center outward.
Leak Test Before Service
With the gasket installed and torqued, bring the system to low pressure first. For liquid service, visually check the joint perimeter for any bead of moisture. For gas, brush a soap solution onto the flange edge and watch for bubbles. Hold at low pressure for several minutes before ramping up.
If a leak appears, do not immediately tighten the bolts further. Depressurize, identify the cause, and if the gasket was over-compressed or misaligned, replace it. A small adjustment to even out bolt load may be acceptable on some materials, but the safest route is to open the joint and inspect.
Mistakes That Undo a Good Gasket
Using a steel scraper. The hardened edge gouges the flange face and leaves furrows that leak. Brass is safer.
Reusing an old gasket. A used gasket has taken a compression set and won’t recover. The cost of a new one is trivial next to resealing the joint a second time.
Guessing torque values. A bolt tightened by feel varies by hundreds of percent between operators. Use a calibrated torque wrench.
Skipping the staged tightening. Jumping straight to final torque in a single pass traps the gasket unevenly and causes blowout.
Ignoring flange alignment. A gasket cannot compensate for a tilted flange. Align the joint first, then insert the gasket.
Applying sealant where none is specified. Sealant can combine with heat and pressure to act as a release agent, letting the gasket slip. Follow the gasket manufacturer’s advice.
Storing Gaskets Before Installation
A gasket that sits on a shelf for months under a pile of heavy parts will take a set before it ever sees a flange. Store sheet and cut gaskets flat. Keep rubber and PTFE gaskets in dark, cool storage. Protect spiral wound gaskets in their packaging until the moment they are fitted. A gasket that arrives at the flange clean, flat, and undamaged starts with an advantage.
When everything—preparation, sequence, torque, and check—is done in order, the gasket seals. There are no shortcuts that deliver the same result.