
A tubular sight glass gives a direct window into what’s flowing through your line, but how it’s put in matters as much as the glass itself. Cutting corners during installation is the fastest way to a cracked tube or a puddle under the equipment. What follows is drawn from real field practice.
Before You Start
Unpack the glass tube and hold it up to a light. Run your thumb around each end checking for chips, then scan the body for scratches or hairline cracks. Anything that catches your fingernail is a failure point waiting to happen—set that piece aside. Gather the matching brackets or flanges and a fresh set of seals. Old gaskets harden over time; don’t reuse them. Now clean the metal seating surfaces. Scrape off any crusted gasket residue, wipe away dirt and oil, and make sure those faces are flat. A stray speck of rust can hold a gap open just enough to leak.
Setting the Glass in Place
Lower the tube into the bottom bracket or fitting. It needs to rest there naturally, centered and square to the bore. If the tube tilts or binds against the metal, stop and find out why. For designs with a packing nut or compression gland, slide those loose parts on now but leave them completely slack. The tube should float freely at this stage—any load on the glass before the seals are engaged invites cracks the moment you tighten things up.
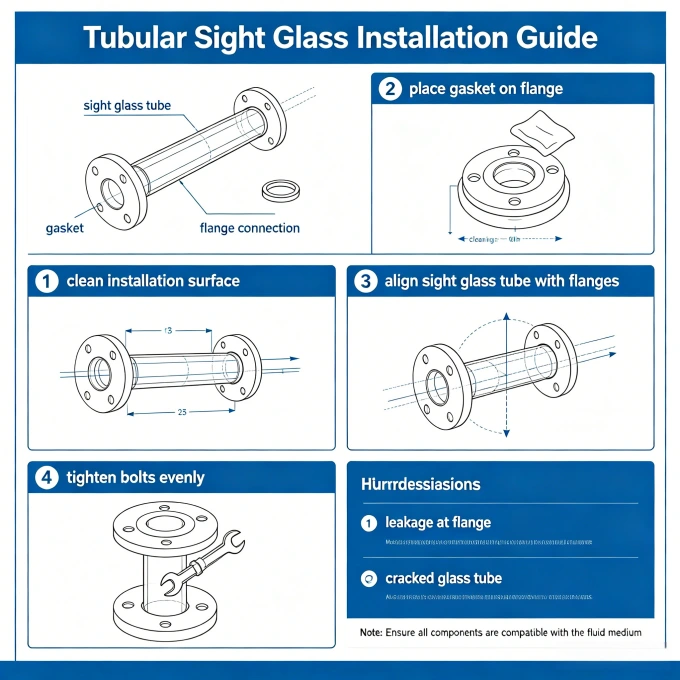 Sealing and Tightening Sequence
Set the seal where it belongs. Depending on the design, that could be a flat gasket, an O-ring tucked into a groove, or packing material wrapped around the tube. Bring the mating flange or upper bracket into position and start every bolt finger-tight. Then pick up a wrench. Work in a diagonal pattern—if the flange has four bolts, tighten opposite pairs across the center, never side-by-side. Build the torque in two or three gradual passes. The goal is to walk the metal down evenly so the glass sees uniform compression all the way around. One-sided tightening bends the tube and concentrates stress right at the edge. With a single compression nut, rotate it a little at a time while checking that the tube stays centered and doesn’t twist. Once all fasteners have reached their final torque, give the tube a gentle wiggle by hand (on an unpressurized line) to confirm it isn’t pinched.
First Checks Before Operation
Visually inspect the assembly. The glass body should clear all metal surfaces except at the sealed ends. Pressurize the line slowly. For liquid service, watch the joints for any bead of moisture. For gas, a soap solution brushed onto the connections will show bubbles if there’s a leak. Let the equipment sit at normal working pressure and temperature briefly, then recheck. Temperature can relax bolt tension, so a second look after the first heat cycle often catches small weeps before they become real problems. If everything stays tight and the glass remains clear, the sight glass is ready for continuous duty.
Daily Use and Handling
Hard tools and sharp edges are the obvious enemies—keep wrenches and heavy fittings away from the glass during nearby work. Less obvious, but just as dangerous, are sudden temperature swings. Spraying a cold cleaning solution onto a tube that’s running hot process fluid will shock it and can fracture it instantly. If you need to clean the outside, do it when the line is cool, and stick to a soft cloth. No wire brushes, no scrapers.
Inspection and Replacement
Put the sight glass on a regular walk-around list. Look for new scratches, a hazy film that won’t wipe off, or fogging inside the tube. Internal fog often means the seal is starting to go or the glass surface is being attacked by the media. If you spot a crack, shut the line down, depressurize it, and drain it before removing the glass. The replacement tube must match the original in material, outer diameter, wall thickness, and length. Swapping in something that “looks close” is how you inherit someone else’s past mistake.
When It Leaks
A drip at the fitting usually points to a seal that has taken a set, dried out, or softened from chemical attack. Before doing anything drastic, check whether the fasteners have backed off from thermal cycling. Often, a small even nudge on each bolt or nut stops it. If that doesn’t work, depressurize and open the assembly. Replace the seals outright—tightening harder against a dead gasket just squeezes it into places it shouldn’t go and loads the glass unevenly. While the hardware is apart, examine the sealing faces for pitting or warping.
When the Glass Cracks
A crack after installation almost always traces back to one of three things: the glass is the wrong grade for the operating temperature, it was stressed during mounting, or it got hit with a thermal shock. Stop the flow, drain the line, and remove the broken pieces carefully—gloves and eye protection are non‑negotiable here. Before putting the new tube in, run a stone or file over any burrs on the metal housings that might have been chewing into the glass. Then re‑evaluate your material choice. If the fluid temperature runs hotter than the tube’s rating, step up to borosilicate. If the process cycles between hot and cold, confirm the glass can ride those swings without building stress. Solving the root cause matters more than a quick swap.
Nothing written here is a shortcut. Every step has a reason tied to a real failure. Take the time to do it evenly and the sight glass will stay transparent for years.